Monday, December 23, 2013

Locked in Ice ... Photo Intense!

On Saturday we got a bit of freezing rain, which coated all the trees in glittery finery.  It was pretty, and I took a few photos in our backyard.
 
 
My favourite white pine, which is a great privacy screen from my backyard neighbour.

 
Another neighbour's beautiful big birch tree looked amazing (centre background).  This tree never fails to delight me :)
 
 
But the rain kept falling, the temperatures fell below 0C and stayed there.  The ice kept forming.  Yesterday, things looked a little less pretty, and more .... hmmm ... sinister.
 
 
The beautiful birch tree, which I love to see in all the different seasons, has been destroyed by the ice.  Tops all broken off by the weight of the ice.  It was so sad to see its broken bones stabbing into the dark morning sky.
 
Everything is locked in ice.  Not a breath of air is moving even the tiniest of branches.  Frozen solid.
 
 
My own pine tree has taken another beating.  Where it lost a limb in a wind storm in the summer, another limb has been lost to this ice storm.
 
 
Broken trees are everywhere in our neighbourhood.  The sound of chainsaws fills the air.
 
 
My pine's limb has crashed again into my old lilac bush.
 
 
The entire pine tree looks like it's being ripped in two.

 
Smaller branches have been ripped out of the trunk and lie frozen into the ground.

 
All the whiteness on the tree is ice, not snow.  I tried to shake the branches to break off some of the ice, but not one little shard of ice fell to the ground.  Nothing will end its agony until the sun can melt it off.


 Hang in there old pine, hopefully today we'll see clear skies and sun to help you heal.

 
As sad as this makes me, I couldn't resist slipping and sliding around on top of the thick crust of ice to take a few pictures.  Everything has changed from ordinary to extraordinary ...
 
The weathervane atop the garden shed ... no wind will turn it today.
Towering poplar behind us ... looking a little droopy :[

 
Ice is thick on every stalk, every branch, every piece of wire ...


Even a bit of chicken wire becomes an art form.


a tiny rose hip transformed to glass crown


Tiny leaves encased in crystal.

 
This is what the pine tree is holding on every needle.
 
Coneflowers

Burning Bush


Amazing ice sculptures.

 
The evergreen in the front is holding up a bit better than the pine in the back.

Just the very tippy top is starting to be pulled over.


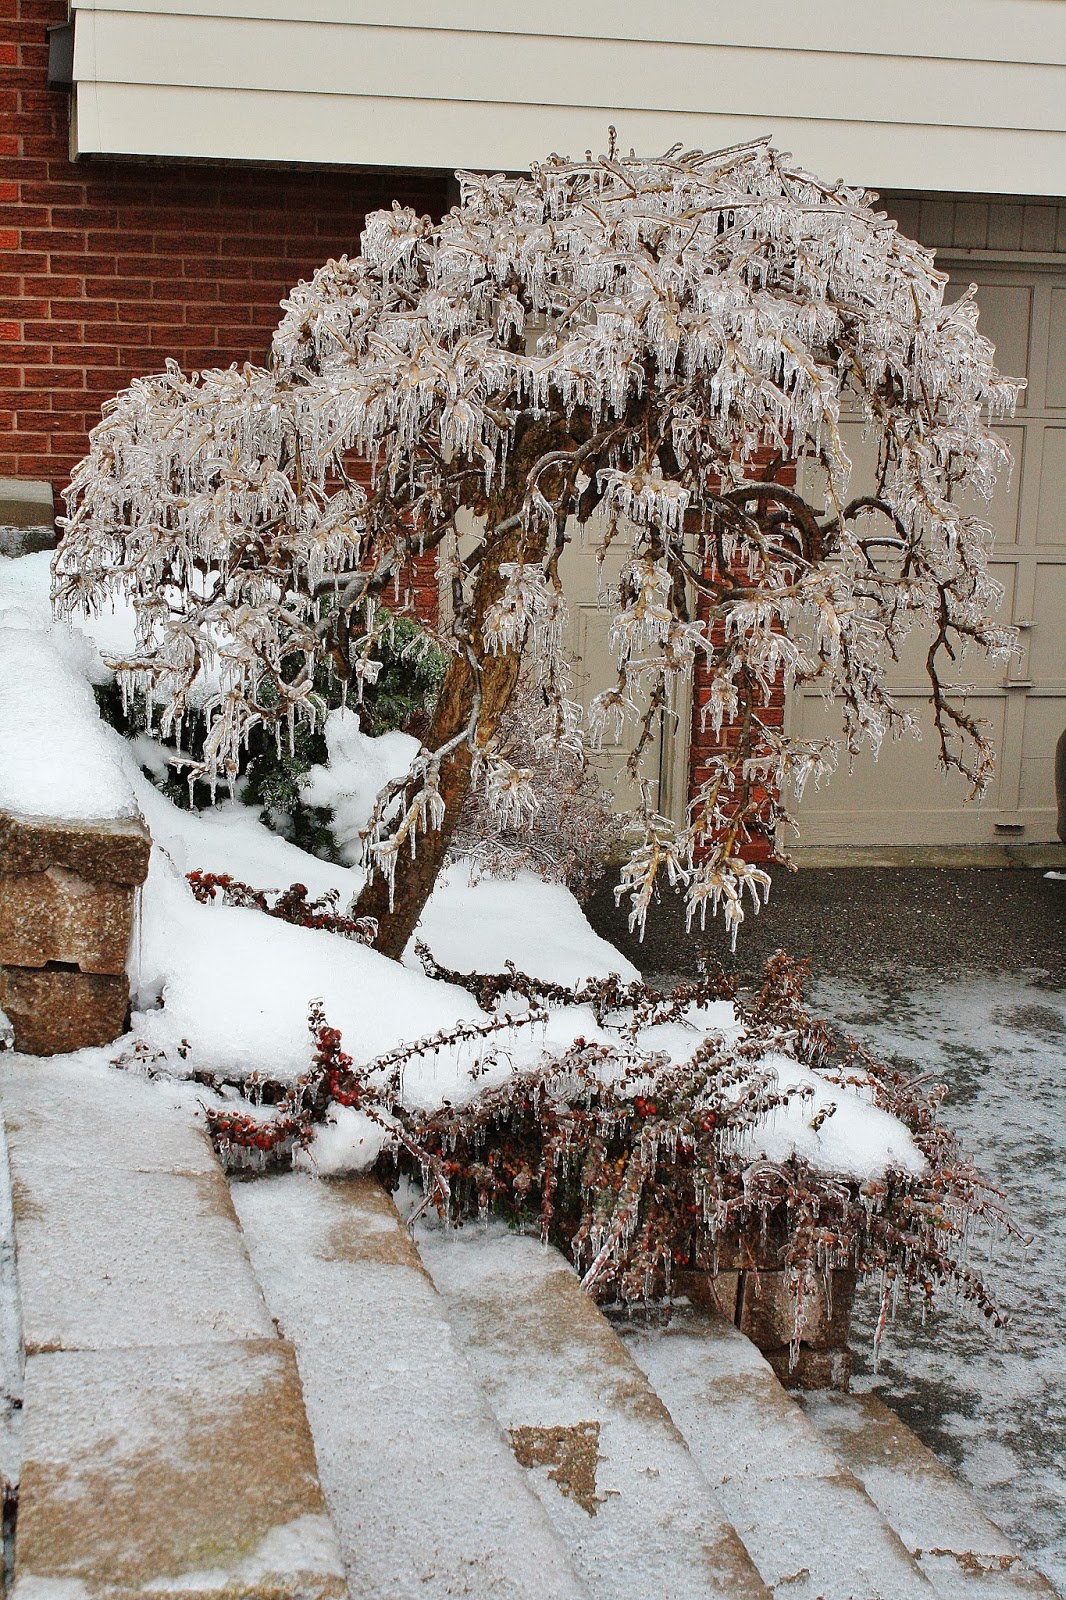
Weeping Pea looks beautiful encased in ice, but so brittle.  The steps are so precarious and no amount of salting melted the ice, as the rain drizzled down most of yesterday.


Worst of all was that our family Christmas dinner was cancelled yesterday.  My nephew was going to host it this year, and they had no power.  Our power has been flickering on and off for two days, but thankfully it's holding on (although the hydro wires are heavy with ice too).   We all would've had to travel a fair distance on the highways, and although I know the highways were probably the safest route (we have an amazing fleet of snow & ice removal vehicles here in the GTA), the risk was still to great for anyone to want to venture out of town.  I heard emergency vehicle sirens continuously while I took these photos ... I can't imagine the accidents out there.
 
 So we all stayed put.  At least all I had to deal with was enough scalloped potatoes to feed 20 people, two dozen mincemeat tarts and a large green salad.  My sister had a 20-lb turkey roasting in the oven and no one coming to eat it :[ 
 
Hope your weather is safe for your travelling this week.  We'll be staying snug inside ... maybe this little black squirrel would like to join us?
 
 
Merry Christmas!
 
Wendy
 

Thursday, December 19, 2013

Caramel Popcorn

Caramel Popcorn is an old favourite of my family's.  I used to make this up for gifts and for school bake sales, and my kids' school parties.  A great sweet treat for New Year's Eve parties too.

 
Doesn't that look good enough to eat!  Would you like to actually try some of this delectable treat for yourself?

 
Well, here's my recipe ... 

 
CARAMEL POPCORN
 
1 cup unpopped popcorn
 
1 cup butter
2 cups brown sugar, packed
1/2 cup corn syrup
1 tsp salt
 
1 tsp vanilla
1/2 tsp baking soda
 
Pop the popcorn, and have ready in a large roasting pan, or other large oven-proof pan.
 
Combine butter, brown sugar, syrup and salt in a medium saucepan.  Heat on stove over medium heat stirring constantly until mixture begins to boil, .  Once it boils, let it boil for 5 minutes without stirring.
 
Remove from heat and stir in vanilla and baking soda.  Pour this mixture over the popped popcorn, and stir gently with a rubber spatula until the popcorn is somewhat coated.  Don't worry if all popcorn is not coated, because you will be stirring it again.
 
Bake popcorn at 250F for 1 hour, stirring every 15 minutes with a rubber spatula (this keeps the popcorn from crumbling too much).  Be sure to scrape the spatula along the bottom of the pan to get up all the caramel that will pool there.
 
Remove from oven and continue to stir gently with the rubber spatula until the popcorn has cooled.  This will keep the popcorn from sticking together in large clumps.


Enjoy!
 
ps once you start eating this stuff it's very hard to stop!
 
Thanks for stopping by!
 
Wendy
 

Thursday, December 12, 2013

Crystal Snowflakes & Tiny Knitted Polar Bear


This idea for Crystal Snowflakes comes from Martha Stewart's "Kids" magazine 2003.  I've been making them pretty much every year since I first saw them.  I love them!  I've made them with lots of kids, and even little guys can help in some way.  This is a fairly easy craft, and the results are really amazing.  Would you like to make one?


WHAT YOU NEED:
  *  white pipecleaners
  *  thin wire (or string)
  *  a large glass or metal bowl or jar (large enough to hold about 8 cups water)
  *  skewer (or stick wide enough to fit across bowl)
  *  Borax (found with laundry detergents)
  *  about 8 cups boiling water
  *  blue food colouring

WHAT YOU DO:
Twist three 5-inch pieces of white pipecleaner together to form a star.  Then twist a 2-inch piece of pipecleaner on each end (bend them upwards a little bit) to complete a snowflake.

Remember!  No two snowflakes are alike.
 
Boil about 8 cups of water.  You will suspend the snowflake into a bowl of water so that it is completely submersed.  But you don't want the snowflake to touch the sides or bottom of the bowl.  Martha used a huge jar.  I use an 8-cup batter bowl.  Test that your snowflake will fit with room to spare around it before you mix up the solution. 
 
Wrap a thin wire around the middle of the snowflake, wrap the other end around a skewer (or whatever you have) to hold the snowflake suspended over your bowl.   Check that the wire holds the snowflake up off the bottom of the bowl.
 
 
Measure out 1-1/2 cups Borax for every 8 cups of boiling water and pour it into the bowl.  Do not let a child do this part please ... the Borax has warnings that it is an eye irritant, and the powder does sift up through the air when it is handled.  For safety reasons keep kids away while you do the mixing with Borax and boiling water.
 
 
Add the boiling water and stir it around until all the Borax has dissolved.  Add about 8 drops of liquid food colouring to the water and stir.  Now lower your snowflake into the bowl.  It might float for a second or two, but once the pipe cleaners absorb the water, it will sink down.  Lay the skewer holding the wire across the top of the bowl.
 
 
Now set the bowl in an out-of-the-way spot.  As the water cools down, crystals will start to form and they'll cling to your pipe cleaner snowflake.  Try not to bump the bowl ... you don't want to disturb the forming crystals.  If you make this in the morning, the kids will have a chance to watch the crystals form throughout the day.  It's a slow process.  Leave this overnight, and by the next morning, the snowflake should have lots of thick chunky crystals on it.  Just pull it out of the water and hang to drip dry. 
 
 
These snowflakes will keep over time, but the crystals turn white as they age.  They make great little gifts for a child to give someone special.  I once made up some for my kids' teachers because it was a warm year with no snow.  I added a snowflake-shaped tag (cut from a cookie cutter) with the recipe printed on it, and a notation "since there's no snow this Christmas, we're just going to have to make it ourselves".  It went over very well :) 
 
 
 WARNING:  Do not pour the Borax solution down your drains!  I pour the water outside in a spot where I'm not worried about killing any plants, and scrape the remaining crystals that form on the side of the bowl into the garbage.
 
Now Cody would like to show you how his one blue eye matches the blue snowflake ...
 
"Did you get my good side?"
 
 Good boy Cody ... you can go now ... Cody and I had a frigid walk this morning (-12C) with a sharp wind.  My face is burning now that we're back insde, and he must be feeling a bit tingly all over too ;)
 
Thanks for stopping by today!
 
Wendy
 
PS  Finished up the tiny knitted polar bear last week ...


Related Posts Plugin for WordPress, Blogger...